Table of Contents

Background
In the last two decades, the rise and adoption of early networks which eventually became collectively known as the Internet, has, in the now modern digital age, enabled connectivity for all humans spanning the globe. With recent enhancements to the Internet’s infrastructure - the most impressive being Starlink - we are all connected in ways previously unknown. This widespread unification has arrived with its own array of benefits and drawbacks.
The ability to extend our reach, influence, and vision without ever leaving the comforts or confines of home have, on one hand allowed us to explore, document, and archive the far ends of the world and its spectra of culture, and yet perhaps more alarmingly, simultaneously allowed us to surveil, manipulate, plunder, and exploit them on the other.
In colorful language, if the use cases above were to be respectfully labeled as “white” (good) and “black” (bad), this post will focus on what could be considered a “gray” area enveloped in with how we as a species have decided, for better and worse, to utilize the Internet.
Advertising - the promulgation of brand with intent to market products and services under it - has proven itself monumental for businesses to thrive in today’s competitive entrepreneurial landscape. Naturally, any business hoping for success will at some point attempt to put itself in the spotlight with a large “for sale” sign. The brighter this light, and the larger this sign, the better. Hopefully, there will be many large signs placed in many strategic locations to garner the most observers possible, as doing so vastly improves the chance for sales.
An even more strategic approach includes targeting the specific audience most likely to initiate a purchase. Fortunately and unfortunately, the Internet has made this easy; while a business may benefit from narrowing its consumer base, and while matchmaking customers with the products they seek may in fact be facilitating to both sides, accomplishing this often includes tracking persistent identity and de-anonymizing the end user. Businesses will even purchase customer browsing data if they believe that analysis of the data will be to their advantage.
Very quickly, despite the potential for no malicious intent, the privacy of the consumer can be, and often is, heavily violated. My previous blog post covers this problem from another angle and provides its own related solution (implementation of a network-wide LAN VPN), but in my mind, this is not the whole story when it comes to safeguarding end user privacy.
Cookies, trackers and analysis of browsing data captured from the client’s web browser activity all still pose a threat. How can a solution be implemented to rectify this problem? As funny as it may be, it starts with (but is not limited to) a $35 computer named after a dessert.
Raspberry Pi

The Raspberry Pi series of single-board computers (SBCs), originally developed in 2009 by The Raspberry Pi Foundation but developed by Raspberry Pi Ltd since 2012, have seen boundless popularity for their low cost, small form factor, and full functionality as portable computers. They have served educational purposes, initially promoting basic computer science principles in the classroom, but have expanded outside their target market into others including robotics, home and industrial automation, and even personal DIY hobbyist projects.
Other factors for their positive reception include an open design and adoption of the HDMI and USB standards for displays and peripherals. The SBCs also feature a Broadcom system on a chip with an integrated ARM-compatible CPU and on-chip GPU. With the ability to install essentially any Linux operating system on the device’s MicroSD or SD card, the capabilities of this mini PC are nearly endless. Raspberry Pi Ltd provides their own Debian-based distribution, Raspberry Pi OS, of which I recommend the Lite version for the context of this post since a full-fledged desktop environment will not be needed.

For this project, I personally used a Raspberry Pi 4 Model B I had purchased some time ago with the intent to use it as a generalized network analyzer. The latest board available as of this writing is the Raspberry Pi 5 (announced September 2023) which lists improvements in both hardware and software over the 4B. The specification requirements for this project do not require the most powerful options available. More on this will follow, but for now, it is only necessary to understand that the demands of the software utilized are minimal and revolve around not much more than configuring and securing an application to function as a local Domain Name System (DNS) server that communicates with upstream recursive DNS resolvers.
DNS
DNS can be a complicated topic. In the most succinct verbiage possible, DNS provides a hierarchical and distributed road map system to resolve (translate) assigned domain names to IP addresses and vice versa. When an end user visits example.com in their web browser, the domain name example.com is resolved to an IP address (93.184.215.14). This is because computers communicate using bit addressing while humans prefer convenient and memorable names of destinations (example.com is easier to remember than 93.184.215.14). DNS has been around since 1985 and remains essential to the functionality of the Internet.
It should come as no surprise there are glaring security and privacy concerns in relation to DNS. Like other protocols across the OSI model (in this case, layer 7), the original design of DNS in the early days of the Internet did not take many security concerns into account given that it was not always open for public participation. The expansion of the Internet into the commercial sector in the 1990s changed the requirements for security measures to protect data integrity and end user authentication. Despite these improvements, there are still valid concerns even today.
Security Concerns
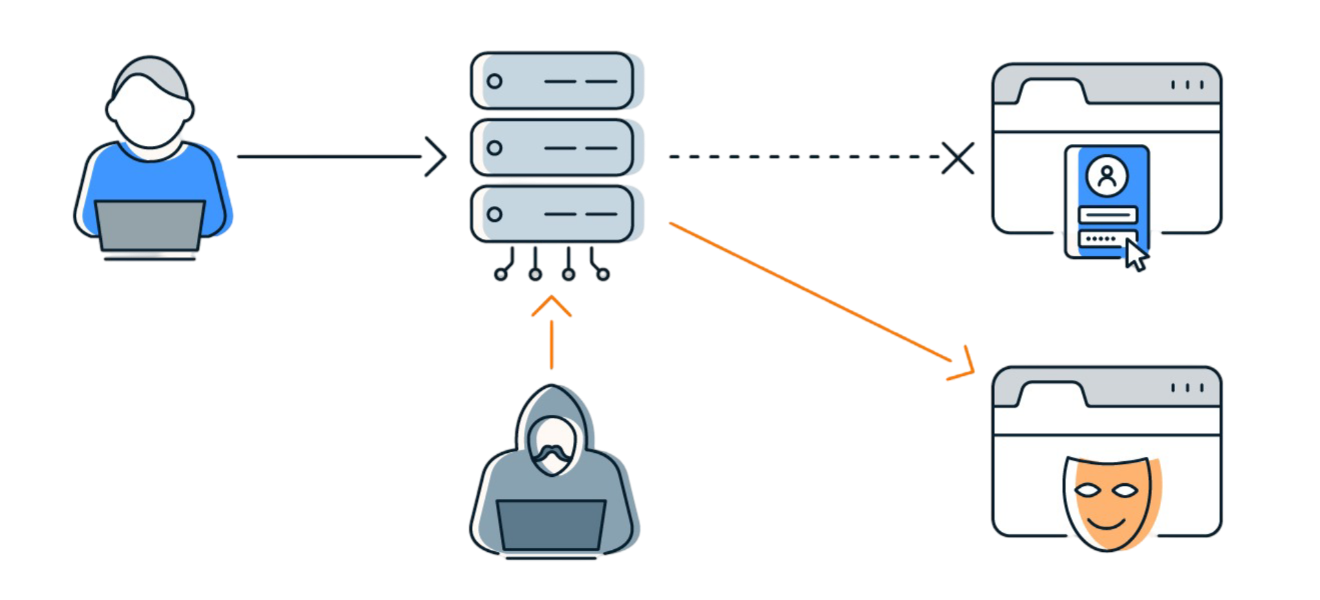
There have been several historical and even some recent successful high-profile attacks leveraged against DNS for exploitation. One attack vector, known as DNS cache poisoning (or DNS spoofing), involves data being distributed to caching resolvers under the pretense of being an authoritative origin server, thereby polluting the data store with false information and long expiration times leading to subsequent DNS request resolution to malicious network hosts rather than to legitimate destinations. The 2015 attack by Lizard Squad on the Malaysia Airlines website is thought to have been the result of a DNS spoofing attack.
Traditionally, DNS requests do not have a cryptographic signature and thus do not provide integrity of data. To address this issue and the threats posed by DNS cache poisoning, Domain Name System Security Extensions (DNSSEC) was created to add support for cryptographically signed responses to DNS and maintain backward compatibility in RFC3833. This means that a DNS resolver is able to check the digital signature and verify if the information is identical to the information published by a DNSSEC protected zone and served on an authoritative DNS server.
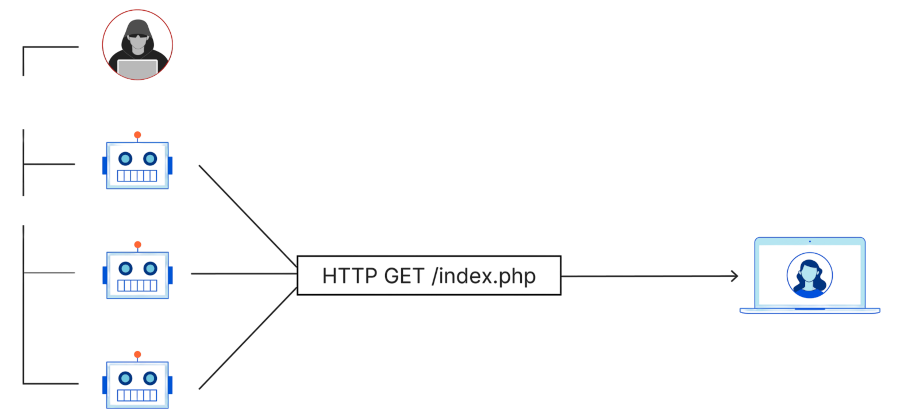
DNS is susceptible to denial of service (DoS) and distributed denial of service (DDoS) attacks, where Internet devices or networks of Internet devices work together to disrupt or, as the name implies, completely deny access to services, applications, or destinations located on the Internet by targetting and overwhelming their available resources. The 2016 DDoS attacks on Dyn disrupted major Internet platforms and services until they became unavailable to large swathes of users in Europe and North America through use of the Mirai botnet.
It is also extremely common for DNS to be used as an attack vector in phishing and other social engineering campaigns. Perhaps the most rudimentary of these involves cloning a legitimate website with a fake but legitimately looking similar domain name to deceive victims into believing the fake website is the real website. Depending on the user’s chosen typeface, the fake domain may even appear to be identical to the real domain. This effective form of typosquatting is known as a homograph attack and is acute in systems supporting internationalized domain names (e.g. paypal.com may appear identical to paypa1.com in some font families).
Privacy Concerns
DNSSEC seeks to provide data integrity (anti-tampering) to DNS, but it does not provide data confidentiality as DNSSEC responses are authenticated but not encrypted. The DNS protocol itself maintains no confidentiality controls; by default, DNS queries and responses are not encrypted, which enables packet sniffing, DNS hijacking, and man in the middle attacks. This deficiency is regularly used by criminals and network administrators for marketing purposes, captive portals, censorship, and tracking persistent identity.
Any party with access to an end user’s DNS query logs can see which domain names or IP addresses were looked up and at what dates and times they were looked up even if the subsequent traffic to these destinations was unreadable (i.e. encrypted).
For instance, if an end user does nothing to protect their DNS traffic, but has set up a VPN to encrypt their network traffic, it is possible that even though their Internet service provider (ISP) cannot see what the user did on a particular website, it can still see that they probably visited the website given that they resolved it in their DNS logs. This is particularly true if DNS requests are being leaked from the end user’s machine or network.
The obvious solution to this problem may seem like forcing DNS queries through the VPN to the VPN provider’s resolvers and following up with several DNS leak tests (e.g. dnsleaktest.com, browserleaks.com, ipleak.com, ipleak.net) to ensure the results match those of the VPN provider. This will certainly be an improvement over not doing so, and barring no other solution, I would highly recommend it, but it does not address the following scenarios:
- What if the end user is not tunneling through a VPN?
- What if the end user is tunneling through a VPN, but seeks additional filtering?
- What if the end user seeks additional filtering either way?
- “Whom can you really trust, anyways?”
There is not much excuse for point #1, so I will not address it any further than what is already addressed in my previous blog post. I recommend researching the best options over at privacyguides.org and encourage implementation of a solution in order to make this point moot.
This blog post seeks to address points #2-4 but technically still does apply to point #1. Point #2 can actually be somewhat accomodated for depending on the VPN provider selected (Proton VPN, for instance, provides additional, optional built-in anti-malware and ad-block filtering), but this post will nonetheless expand and improve upon what may already be baked into the pie in point #3 (pun intended). Point #4 will be addressed towards the end of this section with two viable solutions and is essential to the theme of this guide.
To start with points #2-3, two questions are posed:
- How can the end user configure additional filtering?
- How can the end user secure DNS requests with encryption?
Sinkholing

Question #1 can be addressed with DNS sinkholing, a practice utilized to “blackhole” a specified set of domain names by handing out non-routable IP addresses for DNS requests attempting to resolve domains found in the specified set of domain names. Properly configured DNS sinkholes can be extremely effective at blocking malicious domains and domains known to serve advertisements across an entire network. This impressively includes blocking domains in unconventional places such as smart TVs and other mobile operating systems.
There are regularly maintained and updated sets of domains known to serve advertisements, track end user activity, or be otherwise malicious in nature. Filtering is not limited to these categories. Network administrators may wish to sinkhole other categories for various reasons. Commonly, these categories include domains known to be associated with spyware and intelligence gathering, adult content and pornography, online gambling, narcotics, fraud, piracy, ransomware, spam - the list goes on and on and for good reason. There are even hardware and vendor-specific lists to filter undesired content on certain platforms and operating systems.
DNSCrypt

Question #2 can be addressed with DNSCrypt, a network protocol supporting DNSSEC that encrypts, authenticates, and optionally anonymizes communications between DNS clients and recursive DNS resolvers. By design, it also mitigates UDP-based amplification attacks - special types of DoS or DDoS attacks capable of magnifying bandwidth before traffic arrives at the victim - by requiring queries to be at least as large as the corresponding response.
Operating on both UDP and TCP, DNSCrypt specifies a default port of 443. Interestingly enough, despite utilizing a shared port, DNSCrypt is radically different from HTTPS.
Versions 1 and 2 of DNSCrypt use the X25519 algorithm for key exchange, EdDSA for signatures, and XSalsa20-Poly1305 or XChaCha20-Poly1305 for authenticated encryption. As of 2023, there are no known vulnerabilities in the DNSCrypt protocol nor practical attacks against its underlying cryptographic constructions. These details can be found in the protocol specification on the DNSCrypt website.
The Trust Question

The combination of DNS sinkholing and DNSCrypt provides answers to the filtering and security questions #1-2 and addresses points #2-3. But what about point #4? It is now clear that malicious and advertisement-serving domains can be filtered and DNS queries can be encrypted. This does not, however, address one critical problem: regardless of the upstream recursive DNS resolver chosen, can they be trusted with a log of your DNS requests?
The resolver must be able to read the request to process it and reply with an answer, even if that answer is encrypted. This implies that someone, somewhere, can still, if they want to, theoretically see all the sites an end user visits even if they claim their service does not keep logs, thus defeating the goal of enhancing privacy. It is always safer to assume logs are kept than it is to trust they are not, as the latter fails, at least on principle, to evade the trust problem.
The answer to this question, to quote The X-Files, should be “Trust No 1” (the series was ahead of its time given zero trust architecture is a modern security paradigm). But is there an actual way to implement this given the assumption that the resolver, no matter what they may claim, has access to the log of decrypted DNS requests and the origin IP address which sent them?
It may be thought that the use of a VPN is sufficient to safeguard the origin IP address during DNS query resolution, but this is technically not the case. It is correct that the resolver will only see the IP address owned by the VPN service - not the end user’s true public IP address - but it is important to recall the use of a VPN provides privacy, not anonymity. Sequential DNS queries will all reveal the same origin IP address. This allows the resolver to correlate multiple requests against a single source, even if that source is behind a VPN.
As already mentioned, it turns out there are two viable solutions to the trust problem. The first way would be to eliminate dependence on an upstream resolver by becoming the resolver. The second way would be to encrypt DNS queries with DNSCrypt and anonymize them before they reach the upstream resolver. Information on both of these solutions follow below - each with their own pros and cons - but this post is geared more towards implementation of my personal preference between the two options: anonymization.
Self-Resolution
Eliminating dependence on an upstream resolver may seem like an obvious answer to the trust question. Why not resolve domains yourself by being your own recursive resolver rather than go through the perceived rigamarole of encryption, authentication, and anonymization with a third-party resolver? Well, while being your own resolver cuts out the third-party, it also comes with a few noteworthy limitations.
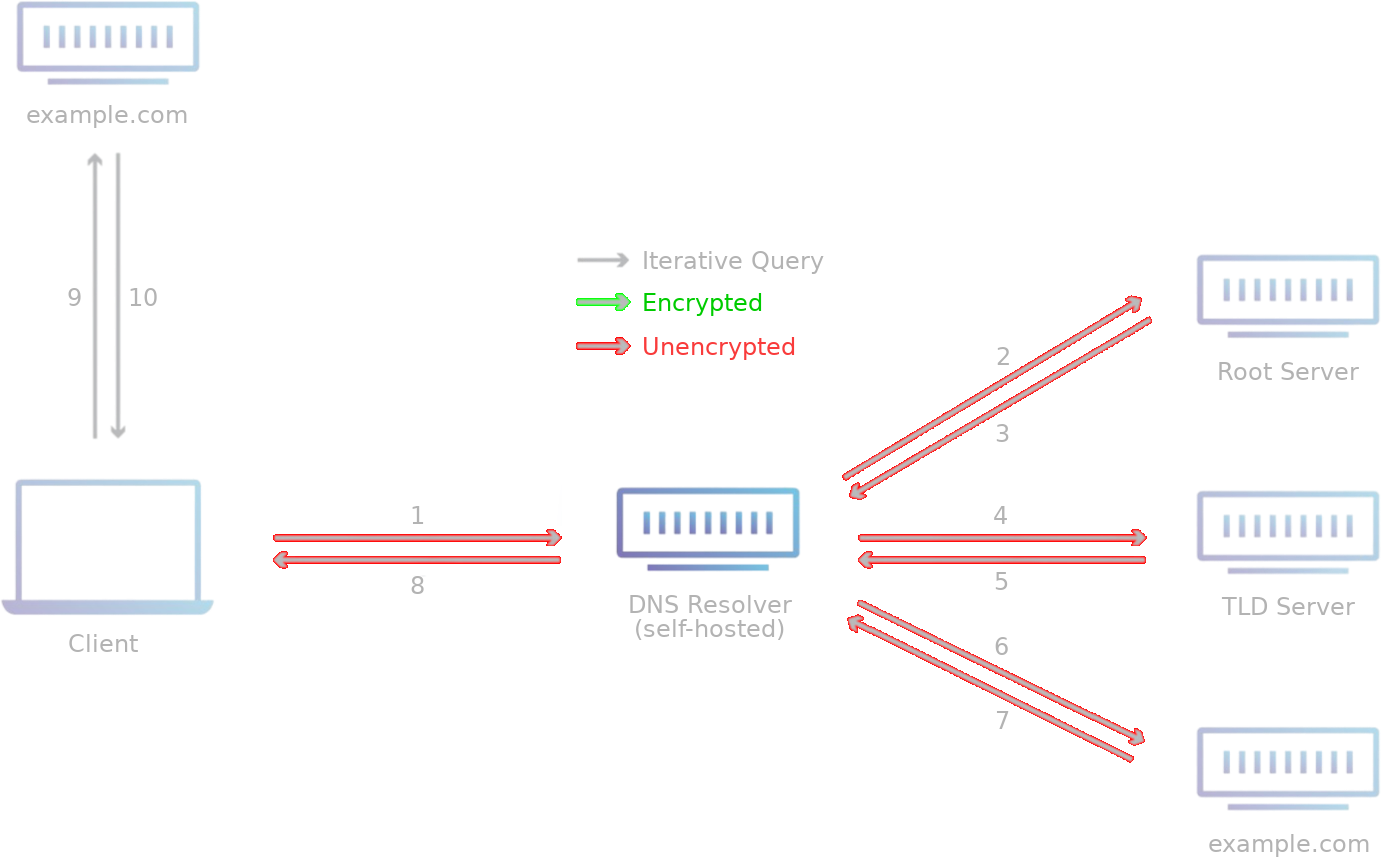
Recursive DNS servers resolve any queries they receive by consulting the authoritative nameservers for the requested domain, traversing the path of the domain across the Internet to deliver the answer to the question. This is true regardless if the recursive server is an upstream third-party or if it is self-hosted - both will do this unless the result is already cached.
This consultation is done in plaintext (thus visible to the ISP), but the route the data travels while traversing the Internet is not easily predicted. Encryption can technically be implemented via DNS over TLS (DoT), but this means that requests would be forwarded on to whichever DoT server is selected, which makes the lookup no longer recursive.
As the responsive servers are being contacted directly, no server can fully log the exact paths being traversed. However, traversing the path can be exhaustive and slow, especially for the first lookup request since the result will not yet be cached.
It is also important to note that pursuing self-resolution helps mitigate the potential for DNS cache poisoning. The DNS servers of large providers are very worthwhile targets for attackers because only one DNS server needs to be poisoned to affect millions of end users. The likelihood for impact by such an attack is minimal when operating your own small recursive DNS server. DNSSEC validation is also supported, but in a more limited capacity.
It is known that DNS lookups to authoritative nameservers may not yield IP addresses to the appropriate final destination for the requestor’s geographic location. Fortunately, the self-hosted recursive resolver can be configured to support geographic location-based DNS resolution.
Other drawbacks include limited scalability and increased network traffic, especially if a large number of clients are concurrently requesting DNS lookups. All of them, unless they are already cached, will need to go through this taxing traversal. Large-scale deployments may suffer performance degradation unless additional resources are provisioned to accomodate the environment. In most LANs and smaller home networks, this will typically be a non-issue.
Pros:
- Security
 DNSSEC validation
- Lower susceptibility to DNS cache poisoning
- No filtering or modification of results
- Privacy
- No third-party access to DNS history
- Other
- Caching of results for subsequent lookups
- Configuration control and visibility
Cons:
- Security
 Plaintext requests visible to ISP/others
- Other
- Limited scalability
- Slow initial lookup times
Anonymized DNS
While the privacy provided by DNSCrypt encryption is clearly a paramount improvement over plaintext DNS, it does little to improve an end user’s anonymity unless anonymization is configured. While the requests are encrypted, the fact that subsequent requests are sent from the same source provides resolvers with methods to identify clients and track client activity. Ideally, each DNS request should be impossible to correlate against the requester.
Historically, end users seeking DNS anonymity implemented DNSCrypt through Tor and SOCKS proxies. However, Tor significantly increases the latency of DNS responses, and public SOCKS proxies are difficult to operate as they can be easily abused for purposes unrelated to DNS. This is why, in 2019, Anonymized DNS was implemented as an extension to the DNSCrypt protocol.
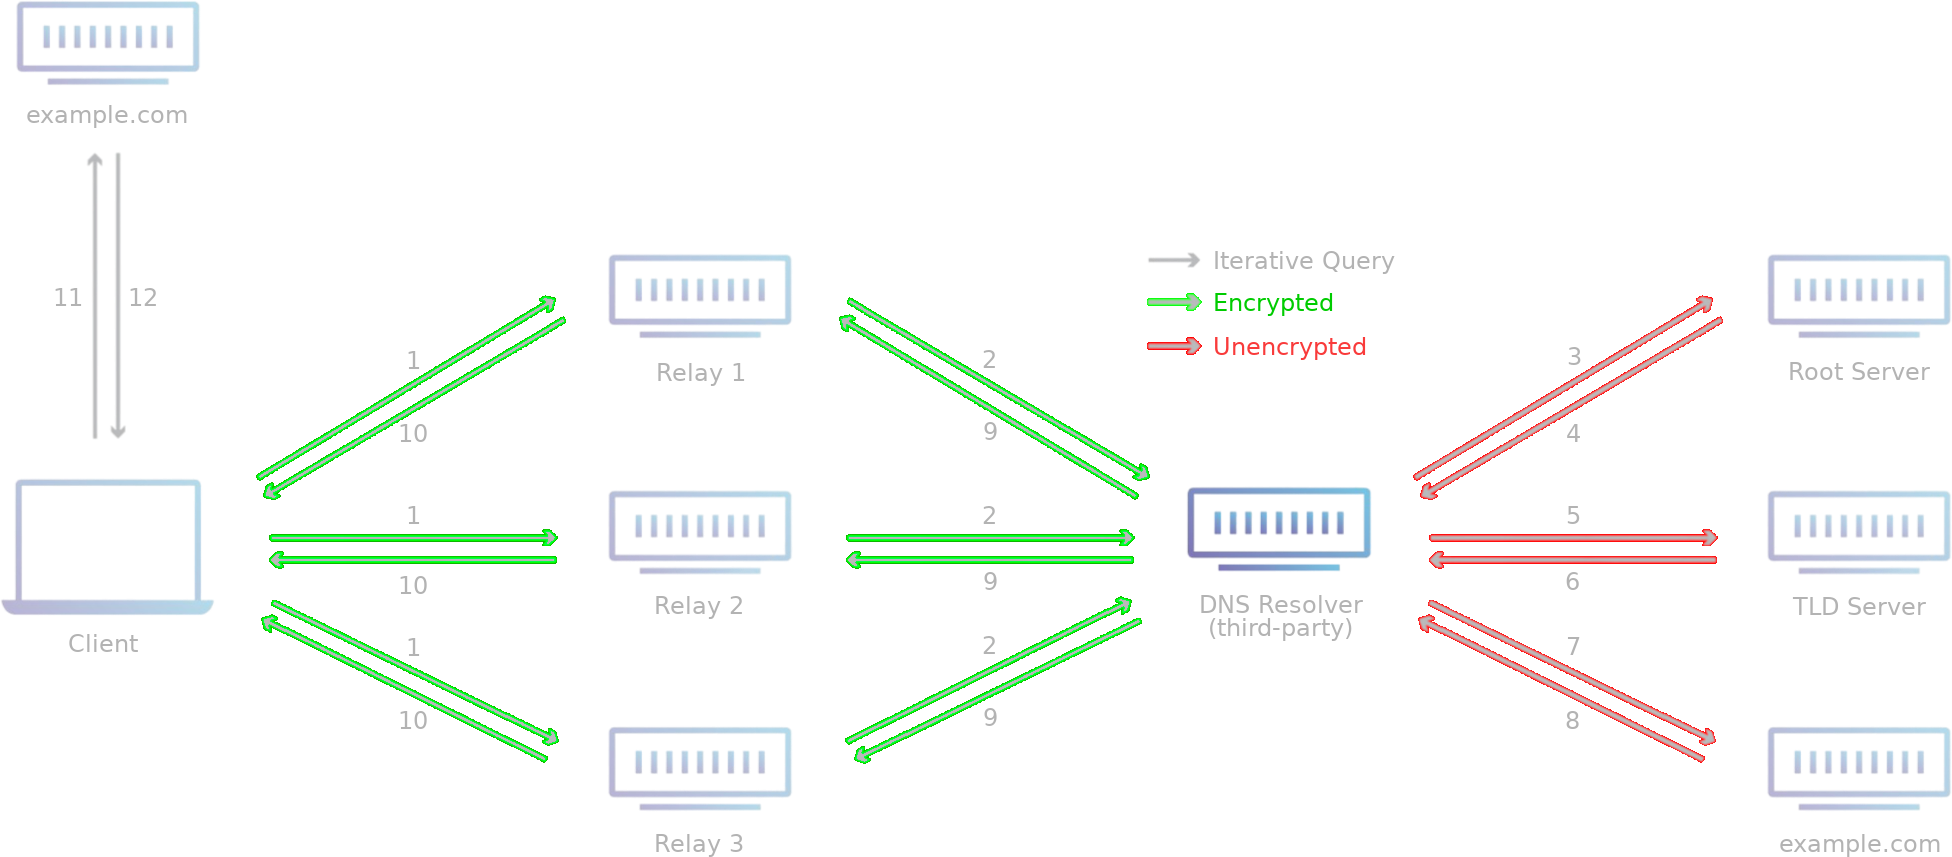
Anonymous DNSCrypt allows (encrypted) DNS queries and responses to be passed through intermediate servers called relays. The client encrypts the queries using the resolver’s public key and, rather than sending them to the resolver directly, the requests are relayed through the intermediate server before arriving at the resolver. The resolver decrypts the requests with its private key and processes them (i.e. recursively resolves them) before providing encrypted responses back through the relay to the client.
The relay does nothing more than passive forwarding of the encrypted query and response between the client and the resolver, which it cannot read. As a result, relays learn nothing about and cannot tamper with DNS queries and responses being exchanged between clients and resolvers. Likewise, the resolver learns nothing of the client’s public IP address. The relay can track multiple queries coming from the same source, but it cannot decrypt them. It is possible to prevent the relay from knowing the client’s public IP address entirely through the use of a VPN.
This means that if DNSCrypt anonymization is implemented, while the resolver can still log DNS history - recalling the assumption that they do - each individual request is relayed, rendering correlatory efforts against client activity impossible. If the resolver logs these queries, they will only appear to have been sent from the relays, not the actual origin. It goes without saying that the more clients there are using relays, the more anonymous the entire system becomes.
The DNSCrypt configuration allows for an arbitrary list of specified DNS resolvers and anonymizing relays. Each specified DNS resolver can be assigned any number of relays from the list of public relays. This makes client DNS traffic flows extremely customizable.
Implementing anonymization on an existing DNSCrypt deployment is trivial, as it only adds a header with a constant sequence followed by routing information to unmodified DNSCrypt queries. Unlike DoH, where headers may still reveal a lot of information about the client’s identity, anonymized DNSCrypt, by design, does not allow the passing of any information at all besides the strict minimum required for routing.
For relay operators, anonymized DNSCrypt is less of a commitment than running a Tor node. Queries can only be relayed over UDP, they need to match a very strict format, amplification is impossible, and loops are prevented. Relays can essentially only be used for encrypted DNS traffic. This specification is documented in the project’s online repository.
Pros:
- Security
- Built-in anti-malware filtering
- DNSCrypt encryption
- DNSSEC validation
- Privacy
- No ISP access to requester’s DNS query
- No (meaningful) third-party access to DNS history
- No relay access to requester’s DNS query
- No relay access to requester’s public IP address if behind VPN
- No resolver access to requester’s public IP address
- Other
- Built-in ad-block filtering
- Caching of results for subsequent lookups
- Censorship protection
- Configuration control and visibility
- Fast lookup times
- Flexible customization
- High scalability
Cons:
- Security
- Higher susceptibility to DNS cache poisoning
- Potential modification of results
Pi-hole

Pi-hole is a Linux network-level advertisement and data tracker blocking application written in Bash, C, PHP, and CSS which acts as a DNS sinkhole and optionally a DHCP server, intended for use on a private network. The application can be configured to use unbound as a local recursive DNS server or DNSCrypt for upstream third-party DNS resolution, and despite being meant for deployment on a Raspberry Pi, it can be installed on almost any Linux machine. It is designed to be lightweight and function on low-power embedded devices with network capability.
Essentially, Pi-hole is the software that combines all of the previously mentioned technologies together behind an easy to use web interface which allows the network administrator to configure adlists, client settings and groups, and optionally monitor query logs. Specific domains can be whitelisted or blacklisted for specific groups and even regex matching is supported.
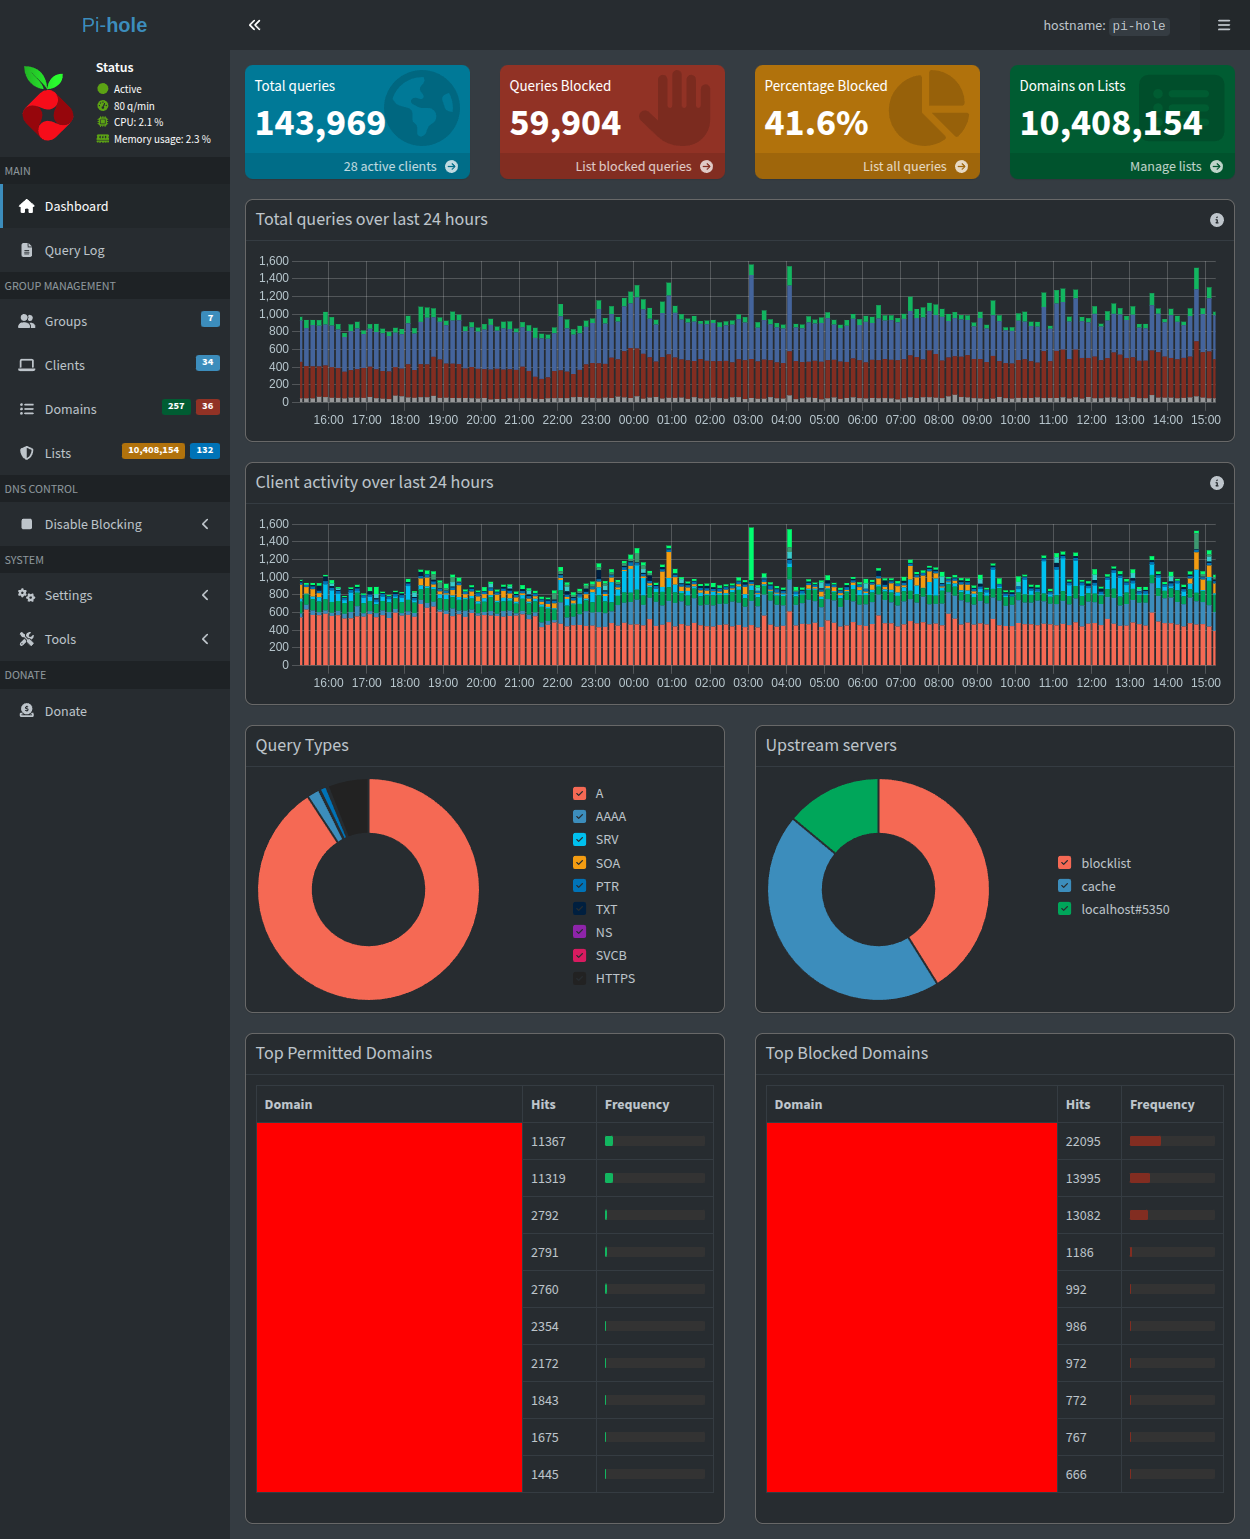
The application’s dashboard - its “homepage” - provides visualization for real time query and client activity statistics. Query logs can be filtered based on the requested domain, query type, client, date/time, status and reply. The application even allows for disabling logging altogether.
The project’s docs site is extensive, well-written, and offers several comprehensive configuration guides for a Pi-hole deployment. As it is a free and open-source (FOSS) application, donations are encouraged to offset the project’s internal monthly expenses. Developers are also encouraged to contribute to the project’s repository.
Implementation

The general outline of steps from start to finish are as follows:
- Install Raspberry Pi OS Lite on MicroSD or SD card
- Install Pi-hole application on the OS
- Assign Pi-hole a static IP address (or DHCP reservation)
- Route Pi-hole through VPN tunnel
- Set router DHCP option 6 to Pi-hole’s IP address
- Configure Pi-hole firewall rules
- Install and configure DNSCrypt
- Implement watchdog script for DNSCrypt
- Reset/renew DHCP leases or reboot router
- Configure Pi-hole clients, groups, adlists, and other settings
For this project, as already mentioned, I utilized a Raspberry Pi 4B. Given the lightweight nature of the Pi-hole application, it is likely to work well on any of the SBCs. The 4B’s major selling point over previous models, to me, is its I/O throughput and gigabit Ethernet port. Nonetheless, Pi-hole can be installed on any compatible Linux system meeting the following requirements:
- >= 2GB minimum (>= 4GB recommended) free disk space
- >= 512MB memory
Pi-hole should be installed on an operating system it officially supports. These include Raspberry Pi OS, Armbian, Ubuntu, Debian, Fedora, and CentOS. I recommend installing Raspberry Pi OS Lite with Raspberry Pi Imager (command line utility rpi-imager). This tool provides a minimal interface and makes the process very easy.
Once the operating system is installed, the Pi-hole application can be installed. The Raspberry Pi will need to be powered on, booted up into the installed operating system, and connected to the network. Once connected to the network, I highly recommend assigning it a static IP address (in my case, a DHCP reservation since I use my router as the DHCP server). This is more of a requirement than a recommendation, as a dynamically assigned IP address for a DNS server will be a nightmare to use properly. The Pi-hole docs cover this on the post-install page.
The Pi-hole docs suggest a curl | bash to install Pi-hole, but as the saying goes, “friends don’t let friends curl Bash.” It is frowned upon from a security perspective, as piping downloaded scripts into Bash to execute them is essentially the equivalent of giving external developers access to your system. It can also cause unanticipated problems if the connection to the site hosting the material terminates mid-line. There are other varied concerns, both inside and outside the topic of security, but I felt the need to point this out as a disclaimer. Interestingly enough, on the same installation instructions page, the Pi-hole docs have their own disclaimer.
In my case, because I run Asuswrt-Merlin, I configured my router to reserve 192.168.1.2 for my Pi-hole’s MAC address, routed it through one of my already configured VPN tunnels with VPN Director, and set DHCP option 6 to instruct LAN devices to use this address as their DNS server. In Asuswrt-Merlin, this can be done following these steps. DNS Director can be used as well (Global Redirection set to Router, Pi-hole’s MAC address set to No Redirection).
Routing the Pi-hole through a VPN tunnel can be done the exact same way as described in my previous blog post. Asuswrt-Merlin’s VPN Director allows the network administrator to direct specific clients on the LAN, based on their private IP address, through a VPN tunnel.

This step is mostly optional, but it only reinforces the necessity for DHCP reservations if implemented. DNSCrypt queries are encrypted and thus not readable by the ISP, but I like the idea of wrapping another protective layer around network traffic whenever feasible. The main drawback is an increase in latency, while the main benefit is an increase in security.
Remember, with anonymous DNS, queries first go to relays before the resolvers. If a VPN is added to the flow, the queries exit the VPN tunnel, then pass through the relays before finally arriving at the resolver. This prevents relays from learning the client’s public IP address.
The Pi-hole docs mention provisioning some firewall rules in iptables to ensure Pi-hole functions properly. I personally implement a separate set of rules outside of these - specifically, the pg2ipset utility to convert PeerGuardian 2 (PG2) blocklists to iptables - and I typically allow all of RFC1918 on my private LAN but it is important to note that the LAN’s DHCP IP pool (the IPs allocated for and assigned to connecting devices) must be allowed as a source range to destination ports 53 and 80 on the Pi-hole. These ports service inbound DNS queries for the sinkhole (and DNSCrypt if not sinkholed) and HTTP requests for the Pi-hole’s web interface.
iptables -I INPUT 1 -s 192.168.0.0/16 -p tcp -m tcp --dport 80 -j ACCEPT
iptables -I INPUT 1 -s 127.0.0.0/8 -p tcp -m tcp --dport 53 -j ACCEPT
iptables -I INPUT 1 -s 127.0.0.0/8 -p udp -m udp --dport 53 -j ACCEPT
iptables -I INPUT 1 -s 192.168.0.0/16 -p tcp -m tcp --dport 53 -j ACCEPT
iptables -I INPUT 1 -s 192.168.0.0/16 -p udp -m udp --dport 53 -j ACCEPT
iptables -I INPUT 1 -p udp --dport 67:68 --sport 67:68 -j ACCEPT
iptables -I INPUT 1 -p tcp -m tcp --dport 4711 -i lo -j ACCEPT
iptables -I INPUT -m conntrack --ctstate RELATED,ESTABLISHED -j ACCEPT
With these steps completed, the Pi-hole should now be reserved on a private IP address, routed through a VPN tunnel, and ready to receive DNS queries from the LAN. The DHCP server on the router has also been configured to instruct LAN devices to use the Pi-hole as their DNS server. Pi-hole can now be configured to use DNSCrypt with anonymization.
dnscrypt-proxy

To install DNSCrypt, I recommend downloading the latest version of dnscrypt-proxy from the project’s repository. The latest release as of this post is 2.1.7, so for Pi-hole, the target file is dnscrypt-proxy-linux_arm64-2.1.7.tar.gz. Once downloaded, extract and delete the archive and rename the directory linux-arm64 to dnscrypt-proxy.
wget https://github.com/DNSCrypt/dnscrypt-proxy/releases/download/2.1.7/dnscrypt-proxy-linux_arm64-2.1.7.tar.gz
tar -xvzf dnscrypt-proxy-linux_arm64-2.1.7.tar.gz
rm dnscrypt-proxy-linux_arm64-2.1.7.tar.gz
mv linux-arm64/ dnscrypt-proxy/
Copy the dnscrypt-proxy directory and its contents to a desired location on the Pi-hole. In my case, I placed these files in /opt. Copy the template configuration example-dnscrypt-proxy.toml to the file that will be used for Pi-hole (e.g. dnscrypt-proxy.toml).
cp -arv dnscrypt-proxy/ /opt/
rm -frv dnscrypt-proxy/
cd /opt/dnscrypt-proxy
cp example-dnscrypt-proxy.toml dnscrypt-proxy.toml
From here, the dnscrypt-proxy.toml file can be edited with any text editor. The following settings are my own complete with explanations provided in comments.
# Quad9 (Switzerland) DNSCrypt servers
server_names = ['quad9-dnscrypt-ip4-filter-pri']

# Loopback address to port 5350
# Inbound queries to :53 forwarded on to localhost:5350
listen_addresses = ['127.0.0.1:5350']

# Specify only IPv4 DNSCrypt servers
ipv4_servers = true
ipv6_servers = false

# Specify only DNSCrypt servers
dnscrypt_servers = true
doh_servers = false
odoh_servers = false

# Require DNSSEC, no logging, allow filtering
require_dnssec = true
require_nolog = true
require_nofilter = false

# No need to require TCP
force_tcp = false

# Randomly select from specified servers by latency
lb_strategy = 'random'

# No need for syslog
use_syslog = false

# Delay, in minutes, after which certificates are reloaded
# Anonymous DNS config also relies on this setting for relay rotation
# https://github.com/DNSCrypt/dnscrypt-proxy/wiki/Anonymized-DNS#caveats
cert_refresh_delay = 240

# Not likely to be used, but just in case, specify Quad9
bootstrap_resolvers = ['9.9.9.9:53', '149.112.112.112:53']
netprobe_address = 9.9.9.9:53

# Block IPv6, immediately respond to queries for hostnames without a domain name or for local zones
block_ipv6 = true
block_unqualified = true
block_undelegated = true

# No need to cache results as Pi-hole will already do this
# Needs to be false for watchdog script to work too
cache = false

# Anonymous DNS routes
# server_name = 'quad9-dnscrypt-ip4-filter-pri' (since we only specified Quad9, '*' also works)
# via=['anon-cs-ch', 'anon-cs-swe'] for Switzerland and Sweden (low latency to Quad9)
# via=['*'] to alternatively allow dnscrypt-proxy to select relays (this automatically avoids resolvers and relays on the same networks)
# Skip resolvers incompatible with anonymization
routes = [
  { server_name = 'quad9-dnscrypt-ip4-filter-pri', via=['anon-cs-ch', 'anon-cs-swe'] }
]
skip_incompatible = true
Once configured, dnscrypt-proxy can be installed as a service. Before installing, I recommend running a configuration check and if all looks good, proceed with the installation and start the service. The binary should print out the following messages when executed, showing that Quad9 DNSCrypt servers are being utilized via two potential Cryptostorm relays.
/opt/dnscrypt-proxy $ sudo ./dnscrypt-proxy -check -config dnscrypt-proxy.toml
[2024-12-09 10:36:40] [NOTICE] dnscrypt-proxy 2.1.7
[2024-12-09 10:36:40] [NOTICE] Source [public-resolvers] loaded
[2024-12-09 10:36:40] [NOTICE] Source [relays] loaded
[2024-12-09 10:36:40] [NOTICE] Anonymized DNS: routing [quad9-dnscrypt-ip4-filter-pri] via [anon-cs-ch anon-cs-swe]
[2024-12-09 10:36:40] [NOTICE] Configuration successfully checked
/opt/dnscrypt-proxy $ sudo ./dnscrypt-proxy -service install
/opt/dnscrypt-proxy $ sudo service dnscrypt-proxy start
Regardless of which resolvers and relays are selected, it is critical to check that there is no overlap, as some resolvers and relays are operated by the same entities. Using resolvers and relays operated by the same service defeats the purpose of anonymization. Use disabled_server_names to disable resolvers in the DNSCrypt config file by name if also using the resolver operator’s relays. This is documented in the DNSCrypt repository.
Finally, it is a good idea to test DNSCrypt to ensure it is functioning properly prior to being utilized with Pi-hole. I also highly recommend implementing a watchdog script to restart dnscrypt-proxy if any problems arise resolving domains (the entire LAN depends on this to work). This is comparable to restarting OpenVPN tunnels in Asuswrt-Merlin.
$ dig pi-hole.net @127.0.0.1 -p 5350

; <<>> DiG 9.18.28-1~deb12u2-Debian <<>> pi-hole.net @127.0.0.1 -p 5350
;; global options: +cmd
;; Got answer:
;; ->>HEADER<<- opcode: QUERY, status: NOERROR, id: 29176
;; flags: qr rd ra; QUERY: 1, ANSWER: 1, AUTHORITY: 0, ADDITIONAL: 1

;; OPT PSEUDOSECTION:
; EDNS: version: 0, flags:; udp: 1232
;; QUESTION SECTION:
;pi-hole.net.			IN	A

;; ANSWER SECTION:
pi-hole.net.		9	IN	A	3.18.136.52

;; Query time: 151 msec
;; SERVER: 127.0.0.1#5350(127.0.0.1) (UDP)
;; WHEN: Mon Dec 09 10:53:53 EST 2024
;; MSG SIZE  rcvd: 56
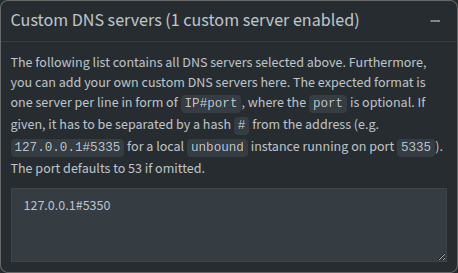
This confirms that DNSCrypt is working. The domain pi-hole.net was requested for resolution using the DNS server located at 127.0.0.1:5350, the destination specified in the dnscrypt-proxy.toml configuration file. Likewise, this can now be tested from a device on the LAN (specifying the Pi-hole’s reserved private IP address rather than loopback, and port 53 rather than 5350). First, configure Pi-hole to use DNSCrypt by navigating to SYSTEM > Settings > DNS and uncheck every box in Upstream DNS Servers as we are only interested in using the Custom DNS servers field. This field should be set to a value of 127.0.0.1#5350 to specify the DNSCrypt service.
┌▪ (drew@pc)-[~]
└▪ dig pi-hole.net @192.168.1.2 -p 53

; <<>> DiG 9.20.3 <<>> pi-hole.net @192.168.1.2 -p 53
;; global options: +cmd
;; Got answer:
;; ->>HEADER<<- opcode: QUERY, status: NOERROR, id: 51209
;; flags: qr rd ra; QUERY: 1, ANSWER: 1, AUTHORITY: 0, ADDITIONAL: 1

;; OPT PSEUDOSECTION:
; EDNS: version: 0, flags:; udp: 512
;; QUESTION SECTION:
;pi-hole.net.			IN	A

;; ANSWER SECTION:
pi-hole.net.		215	IN	A	3.18.136.52

;; Query time: 153 msec
;; SERVER: 192.168.1.2#53(192.168.1.2) (UDP)
;; WHEN: Mon Dec 09 10:56:26 EST 2024
;; MSG SIZE  rcvd: 56
On Pi-hole, a simple watchdog script with logging capabilities follows. It can either be wrapped in an infinite loop (while true; do dig ...; done) or added as a cron job (the following example utilizes the latter, and runs every minute).
#!/bin/bash

get_date_time() {
    echo "$(date '+%m-%d-%Y-%H-%M-%S')"
}

log() {
    base="$(basename $0 .sh)"
    echo "[$(get_date_time):$base] $1" | tee -a "$base.log"
}

if [[ "$(dig pi-hole.net @127.0.0.1 -p 5350 | grep -o "NOERROR")" != "NOERROR" ]]; then
    service dnscrypt-proxy restart
    log "dnscrypt-proxy restarted"
fi
* * * * * root /home/drew/Scripts/dnscrypt_checker.sh
Once added, restart cron (service cron restart). Resulting logs will match the following format whenever the watchdog script detects that dnscrypt-proxy has failed to resolve pi-hole.net (or any other domain/list of domains). It would actually probably be better to provide the script a list of say ~3 domains just in case any one of them has an issue on their end.
[12-07-2024-09-59-01:dnscrypt_checker] dnscrypt-proxy restarted
[12-08-2024-04-01-16:dnscrypt_checker] dnscrypt-proxy restarted
[12-09-2024-09-54-01:dnscrypt_checker] dnscrypt-proxy restarted
...
From here, the router can either be rebooted (this is probably the safest and easiest way) or the DHCP lease table can be reset and renewed for every client on the LAN. When these devices reconnect, they should be instructed to use the Pi-hole’s private IP address for their DNS server. Logs should show up in MAIN > Query Log and SYSTEM > Tools > Tail log files > pihole.log. Queries can also be monitored from the command line with pihole -t or pihole tail (press Ctrl+C to exit).
drew@pi-hole:~ $ pihole -t
  [i] Press Ctrl-C to exit
Dec  9 15:38:35: reply easylist-downloads.adblockplus.org is NODATA-IPv6
Dec  9 15:38:36: query[A] plausible.io from <redacted>
Dec  9 15:38:36: forwarded plausible.io to 127.0.0.1#5350
Dec  9 15:38:37: reply plausible.io is 89.187.165.194
Dec  9 15:38:37: query[A] plausible.io from <redacted>
Dec  9 15:38:37: cached plausible.io is 89.187.165.194
Dec  9 15:38:37: query[AAAA] plausible.io from <redacted>
Dec  9 15:38:37: forwarded plausible.io to 127.0.0.1#5350
Dec  9 15:38:37: reply plausible.io is <HINFO>
Dec  9 15:38:37: reply plausible.io is NODATA-IPv6
Dec  9 15:38:46: query[A] es.prod.gws.ring.amazon.dev from <redacted>
Dec  9 15:38:46: forwarded es.prod.gws.ring.amazon.dev to 127.0.0.1#5350
Dec  9 15:38:46: reply es.prod.gws.ring.amazon.dev is <CNAME>
Dec  9 15:38:46: reply eventsinkgw.prod.gws.ring.amazon.dev is <CNAME>
Dec  9 15:38:46: reply eventsinkgw-geo.prod.gws.ring.amazon.dev is <CNAME>
Dec  9 15:38:46: reply eventsinkgw.us-east-1.prod.gws.ring.amazon.dev is <CNAME>
Dec  9 15:38:46: reply eventsinkgw.c1.us-east-1.prod.gws.ring.amazon.dev is <CNAME>
Dec  9 15:38:46: reply eventsinkgw-alb.c1.us-east-1.prod.gws.ring.amazon.dev is 75.101.164.46
Dec  9 15:38:46: reply eventsinkgw-alb.c1.us-east-1.prod.gws.ring.amazon.dev is 18.208.239.19
Dec  9 15:38:46: reply eventsinkgw-alb.c1.us-east-1.prod.gws.ring.amazon.dev is 3.213.8.0
Dec  9 15:38:46: reply eventsinkgw-alb.c1.us-east-1.prod.gws.ring.amazon.dev is 18.205.100.125
Dec  9 15:38:46: reply eventsinkgw-alb.c1.us-east-1.prod.gws.ring.amazon.dev is 54.160.75.229
Dec  9 15:38:46: reply eventsinkgw-alb.c1.us-east-1.prod.gws.ring.amazon.dev is 52.207.193.21
Dec  9 15:38:46: reply eventsinkgw-alb.c1.us-east-1.prod.gws.ring.amazon.dev is 184.72.148.192
Dec  9 15:38:46: reply eventsinkgw-alb.c1.us-east-1.prod.gws.ring.amazon.dev is 107.20.196.34
...
I will often use pihole -t | grep "blocked" to see which requests are being actively sinkholed across my LAN from the command line.
drew@pi-hole:~ $ pihole -t | grep "blocked"
Dec  9 15:54:50: gravity blocked mobile.events.data.microsoft.com is 0.0.0.0
Dec  9 15:54:53: gravity blocked dns.msftncsi.com is 0.0.0.0
Dec  9 15:55:00: gravity blocked device-provisioning.googleapis.com is 0.0.0.0
Dec  9 15:55:04: gravity blocked slackb.com is 0.0.0.0
Dec  9 15:55:26: gravity blocked d.joinhoney.com is 0.0.0.0
Dec  9 15:55:26: gravity blocked d.joinhoney.com is ::
...
If queries are sparsely being sinkholed, or not sinkholed at all, it is probable that the summarized adlist needs to be updated. This can be done with pihole -g at the command line or SYSTEM > Tools > Update Gravity in the web interface. If no adlists are configured (see GROUP MANAGEMENT > Lists), my current set can be found here. This set of 132 adlists, when summarized, as of the date and time of this writing, blocks a total of 10,408,154 domains.
drew@pi-hole:~ $ pihole -g
  [i] Neutrino emissions detected...
  [✓] Pulling blocklist source list into range

  [✓] Preparing new gravity database
  [✓] Creating new gravity databases
  [i] Using libz compression

  [i] Target: https://raw.githubusercontent.com/StevenBlack/hosts/master/hosts
  [✓] Status: Retrieval successful
  [✓] Parsed 121860 exact domains and 0 ABP-style domains (ignored 1 non-domain entries)
      Sample of non-domain entries:
        - "0.0.0.0"

  [i] List stayed unchanged

  [i] Target: https://raw.githubusercontent.com/PolishFiltersTeam/KADhosts/master/KADhosts.txt
  [✓] Status: Retrieval successful
  [✓] Parsed 83391 exact domains and 0 ABP-style domains (ignored 0 non-domain entries)
  [i] List stayed unchanged

  [i] Target: https://raw.githubusercontent.com/FadeMind/hosts.extras/master/add.Spam/hosts
  [✓] Status: Retrieval successful
  [✓] Parsed 57 exact domains and 0 ABP-style domains (ignored 0 non-domain entries)
  [i] List stayed unchanged
...
From here, configuration of groups, clients, domains, and adlists is up to the network administrator’s discretion. I personally recommend regex blacklisting the following patterns for the default group to expand upon what the summarized adlist will sinkhole.
^(.+[_.-])?adse?rv(er?|ice)?s?[0-9]*[_.-]
^(.+[_.-])?telemetry[_.-]
^ad([sxv]?[0-9]*|system)[_.-]([^.[:space:]]+\.){1,}|[_.-]ad([sxv]?[0-9]*|system)[_.-]
^adim(age|g)s?[0-9]*[_.-]
^adtrack(er|ing)?[0-9]*[_.-]
^advert(s|is(ing|ements?))?[0-9]*[_.-]
^aff(iliat(es?|ion))?[_.-]
^analytics?[_.-]
^banners?[_.-]
^beacons?[0-9]*[_.-]
^count(ers?)?[0-9]*[_.-]
^mads\.
^pixels?[-.]
^stat(s|istics)?[0-9]*[_.-]
For streaming services, the following patterns should be whitelisted. Adding these will save time compared to discovering them on one’s own, and leaving them blacklisted may break subtitles and other features from being served in streaming apps. In my own LAN, I reserved a /30 for the 4 relevant streaming devices (each with their own DHCP reservation) and placed them in their own group. I then assigned these patterns only to that group’s whitelist (the remaining LAN devices will not have these patterns whitelisted).
(\.|^)adtology\.com$
(\.|^)cws-hulu\.conviva\.com$
(\.|^)cws\.conviva\.com$
(\.|^)dpm\.demdex\.net$
(\.|^)hulu\.com$
(\.|^)hulu\.com\.akadns\.net$
(\.|^)huluad\.com$
(\.|^)huluim\.com$
(\.|^)netflix\.com$
^(.*|)(akamai|edgecast|level3|limelight)(.*|)$
^(ads|http)-[a-z]{1,2}-darwin.(hulu(stream|)).com
apicache.vudu.com
hulu.hb-api.omtrdc.net
os.fandango.com
Various other filters for both blacklisting and whitelisting domains are available across the Internet. It will ultimately be up to the network administrator’s discretion on what to block and allow. I highly recommend utilizing a search engine in this pursuit.
Conclusion

The target flow has DNS queries from the LAN arrive at the Pi-hole on port 53. Pi-hole checks whether or not to sinkhole the request. If yes, a dummy address is returned to the client. If no, the request is forwarded on to the local DNSCrypt service on port 5350. The request is encrypted and sent through the VPN where it exits (still DNSCrypt encrypted) before arriving at the anonymization relay, which in turn forwards it on to the third-party resolver on port 443.
The resolver decrypts the request, and checks if the request should be filtered (typically upstream resolvers have their own filtering/sinkhole configured). If yes, a dummy address is returned to the client. If no, the resolver recursively … resolves … the query.
The resolver encrypts the result and sends it back to the anonymization relay, which in turn sends it back through the VPN to the DNSCrypt service running on the Pi-hole. The response is decrypted and given to the client. Pi-hole caches the result for subsequent lookups.
If the steps listed above are followed correctly, the end result topology for the entire LAN’s DNS traffic will be, in my opinion, as secure and private as it can possibly be in the year 2024.
Caveats
The biggest flaw with sinkholing ads is that many platforms, including YouTube, realized sinkholes could be defeated by serving ads from the same domains as those serving content. Thus, to block the ad would mean blocking the video as well. This is of no consequence to desktop web browsers with ad-blocking capabilities and a collection of handy extensions, but it may be a problem on e.g. smart TV apps and gaming consoles.
I have managed to find two “solutions” to this problem, one of which is confirmed working and the other still being a work in progress. The working solution is for YouTube specifically, and basically just requires a VPN tunnel terminating in Albania, Moldova, or Myanmar. The second solution builds upon the first and involves harvesting streaming service ASNs and bypassing the summarized ranges to the WAN in VPN Director. Streaming services will often drop on-screen error codes when behind VPNs (e.g. “we’re sorry, this media is not available in your region.”), so bypassing only those ranges which trigger these error codes could be a hypothetical avenue to pursue. In my minimal testing I did see incremental but imperfect success.
Another growing annoyance is that rather than monetizing video content through the platform hosting the content, creators now embed referrals and sponsorship segments in the content itself to circumvent end user ad-blockers. Fortunately, this problem is largely already solved with SponsorBlock (seriously, give it a try).
Regardless of the perpetual game of cat and mouse, implementing anonymized DNSCrypt through a VPN is far, far more secure and private than regular old plaintext DNS. Combine these with a free and open-source, highly-customizable DNS sinkhole and there are suddenly certainly way better things to worry about. For instance … what is beyond the event horizon?
Changelog
Update: Jan 25, 2025 (YouTube Ads Defeated)
Mostly an update to the caveats section: harvesting ASNs for WAN bypasses may be an overkill/over-engineered solution (not to mention it means knowingly leaking traffic outside the VPN to a set of CIDRs). Many VPN providers now natively support streaming service functionality (e.g. Proton’s Plus servers). While they do provide e.g. Moldovan Plus servers, services like Hulu will only function if located within the United States. I was able to route all my streaming services through a Plus server in the United States and maintain streaming service functionality, which in my mind, is a better option than bypassing these devices to the WAN.
YouTube advertisements are still a problem, but at least this traffic is now secured. In an ideal world, we’d be able to install extensions on smart TV apps. Fortunately, a similar solution to what can be accomplished on PC and other platforms exists for smart TVs: sideloading.
SmartTubeNext is an application that can be installed on Smart TVs, Amazon Fire TV, Android TV, and even Roku which acts as an alternative “frontend” for the normal YouTube app (comparable to FreeTube on PC) that natively supports ad-blocking and SponsorBlock services. I was able to defeat all YouTube ads on my smart TVs by installing SmartTubeNext on an Amazon Fire TV Stick 4K Max following the installation guide on the project’s website.
Update: Feb 23, 2025 (Remote Access)
I somewhat randomly came to the realization that it would be neat to utilize Pi-hole on my phone (or other devices) when away from home. To do this, the Pi-hole must either:
- Be accessible to the WAN directly as a DNS server (bad idea)
- Remain accessible only to the LAN directly but also to the WAN via VPN
Option #1 is not as ideal as #2. It would require forwarding port 53 to the Pi-hole and be somewhat impossible to securely firewall given changing public source IPs sending in DNS traffic. It also goes without saying this would defeat the entire purpose of this post, as this would make the DNS requests visible being unencrypted (unless a DNSCrypt server service is set up on the Pi-hole, thus require forwarding e.g. port 5350 instead, but this is unnecessarily complicated compared to option #2 and would still be pretty impossible to firewall). The ISP (and anyone else monitoring flows) would just see them as being inbound rather than outbound.
Option #2 would allow devices from the WAN to tunnel into the LAN and be given static local IP addresses and secure their unencrypted DNS traffic over the encrypted VPN. This also alleviates the firewalling complication as the secure VPN protocols utilize PKI, thus only permitting authentication to clients that possess the proper keys. The only firewalling requirement should be allowing access to additional RFC1918 address ranges that the VPN server assigns to clients if they are not already allowed (as already mentioned above, I typically allow all of RFC1918 by default) in the Pi-hole’s iptables rules.
PiVPN is one popular choice that makes the entire process quite easy to do. I thought it worth mentioning for the context of this post because it could be considered a more user-friendly approach to set up a VPN server and is - if the name was no indicator - branded around the Raspberry Pi platform. In my case, my router already natively supports hosting a VPN server (specifically: PPTP, IPsec, OpenVPN, and WireGuard).
Consequently, I decided to get with the times and set up a WireGuard VPN server on my router. To connect to the VPN as WireGuard clients on mobile devices, the WireGuard application is required. This can be found at the following links for Google and Apple products.
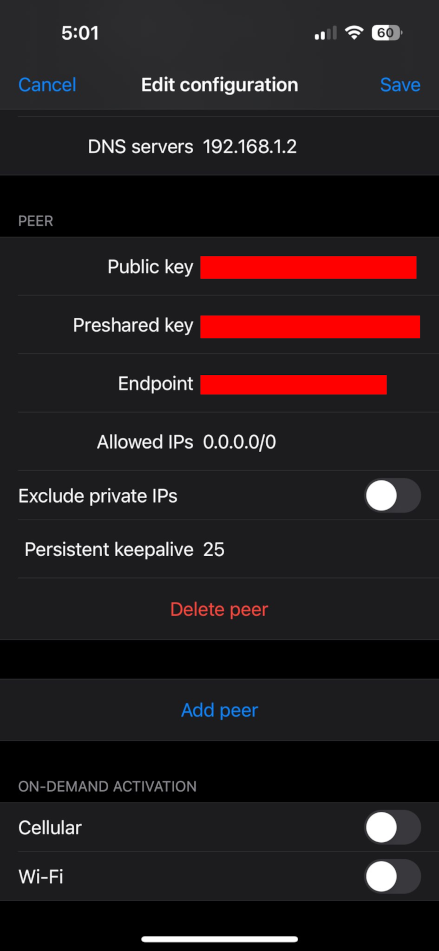
In Asuswrt-Merlin, WireGuard can be set up in Advanced Settings > VPN > VPN Server > Others, selecting WireGuard VPN, and configuring its details. When adding a WireGuard client, by default, Asuswrt-Merlin assigns 10.6.0.2 as its IP address (Address) and 10.6.0.1 as its DNS server (DNS). The former can be edited directly in the web UI, but for whatever reason, it does not allow the DNS server to be modified.
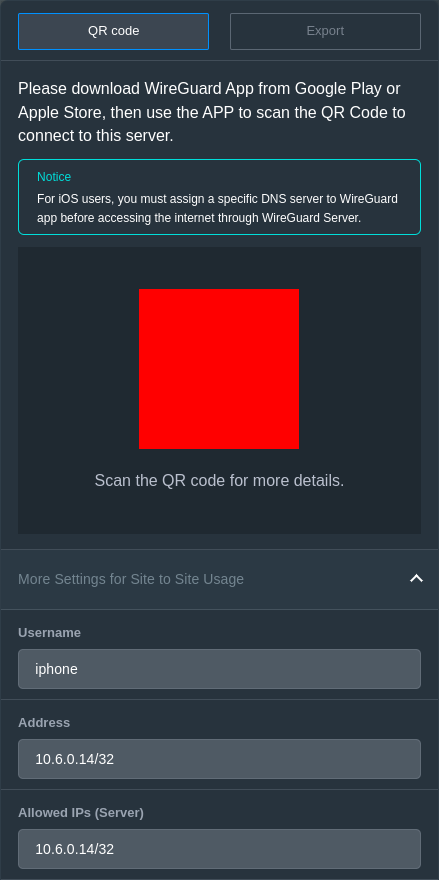
In my case, I changed Address and Allowed IPs (Server) from 10.6.0.2/32 to 10.6.0.x/32 where x is the same octet I assigned to my phone’s DHCP reservation in the 192.168.1.0/24 address pool (192.168.1.x). This makes it easy to identify which device it is regardless if it connects directly to the LAN or over the VPN to the LAN.
To update the DNS setting in the WireGuard client configuration, the web UI gives two options: QR code and Export. In my opinion, QR code is much easier if the connecting device has a camera. Once the QR code is scanned, the DNS servers option in the mobile application can be updated from 10.6.0.1 to the Pi-hole’s reserved IP address (in my case, this is 192.168.1.2).
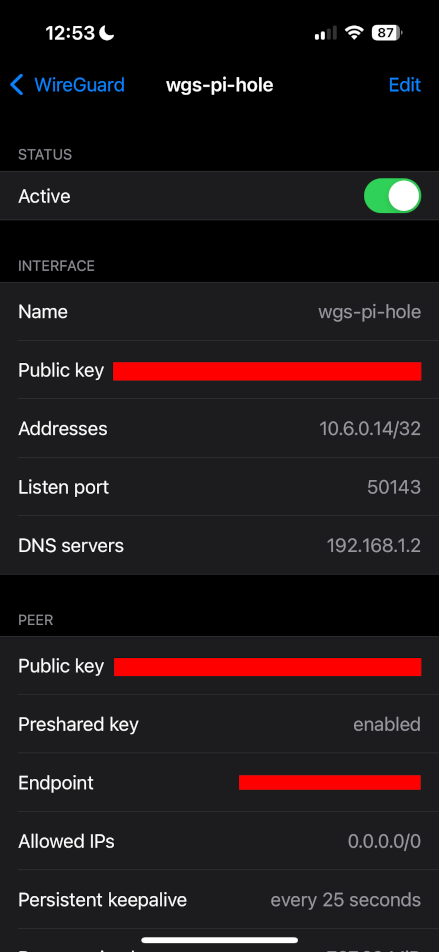
If the 10.0.0.0/8 network is not already allowed in the Pi-hole’s firewall, I recommend simply adding the 10.6.0.0/24 range just to narrow down the size (assuming 10.6.0.x is being used for VPN clients). This can be done in iptables (explanation: 192.168.1.0/24 is my LAN DHCP pool, 10.6.0.0/24 is my WireGuard client subnet).
iptables -A INPUT -s 192.168.1.0/24,10.6.0.0/24 -j ACCEPT
iptables -A OUTPUT -d 192.168.1.0/24,10.6.0.0/24 -j ACCEPT
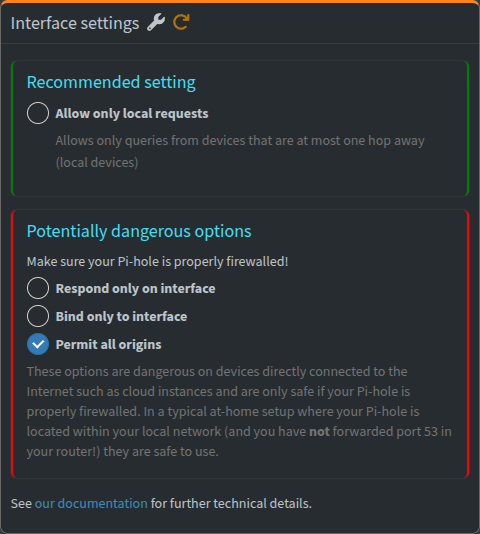
Finally, in the Pi-hole web UI, under SYSTEM > DNS > Interface settings, the Permit all origins option must be selected or DNS queries coming from more than one hop away will be ignored. The web UI correctly points out this is safe to use assuming port 53 has not been forwarded to the Pi-hole (recall my statement above about option #1 being a bad idea).
The WireGuard connection can now be tested by going into the WireGuard mobile app and toggling the configured tunnel status to Active. If the connection is successful, the peer should show up in Asuswrt-Merlin’s Advanced Settings > VPN > VPN Status > WireGuard Server (note: while on the LAN, Asuswrt-Merlin correctly lists the peer’s Endpoint as 192.168.1.x but updates it to its WAN IP when not on the LAN i.e. away from home):
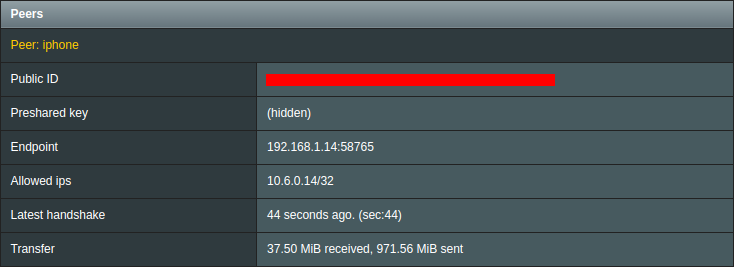
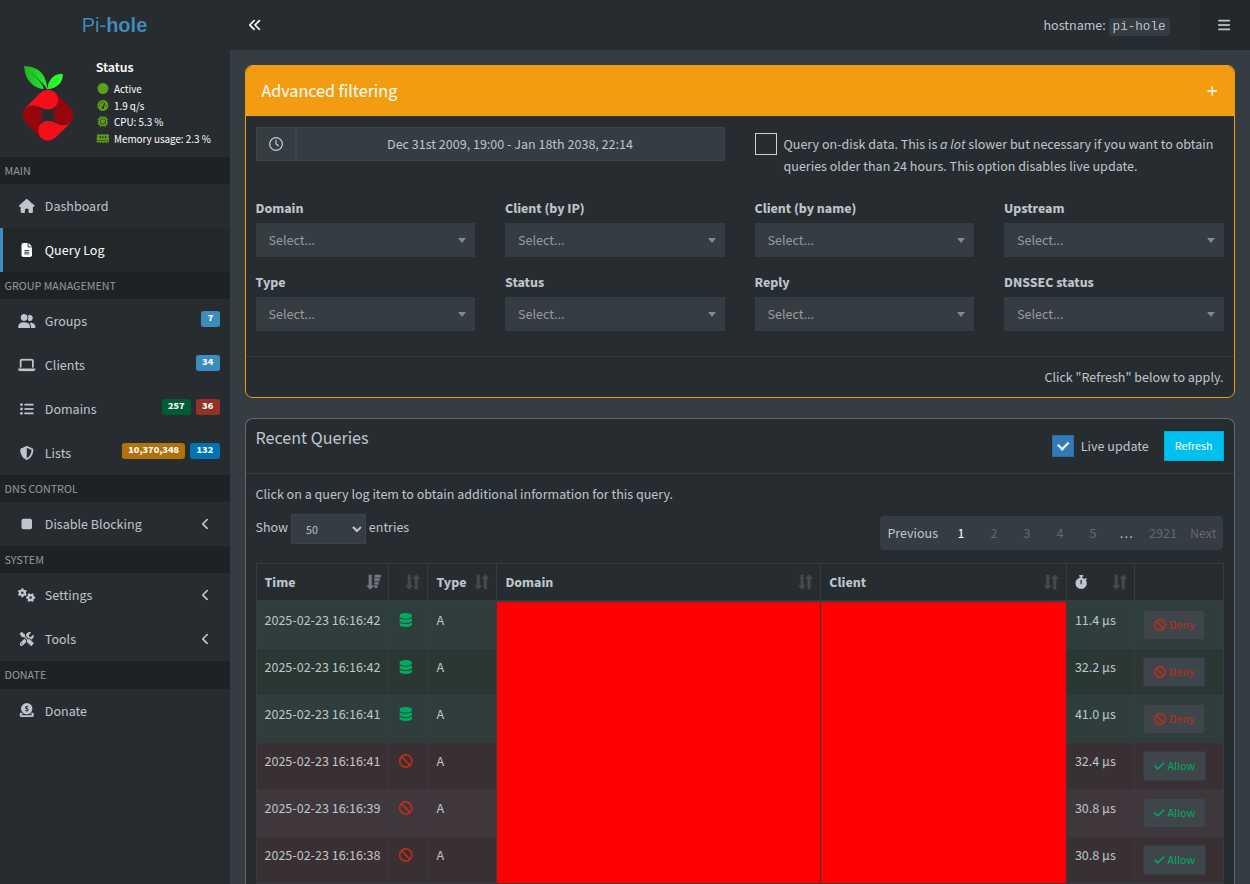
In addition, DNS queries should start being logged in the Pi-hole query log for 10.6.0.x:
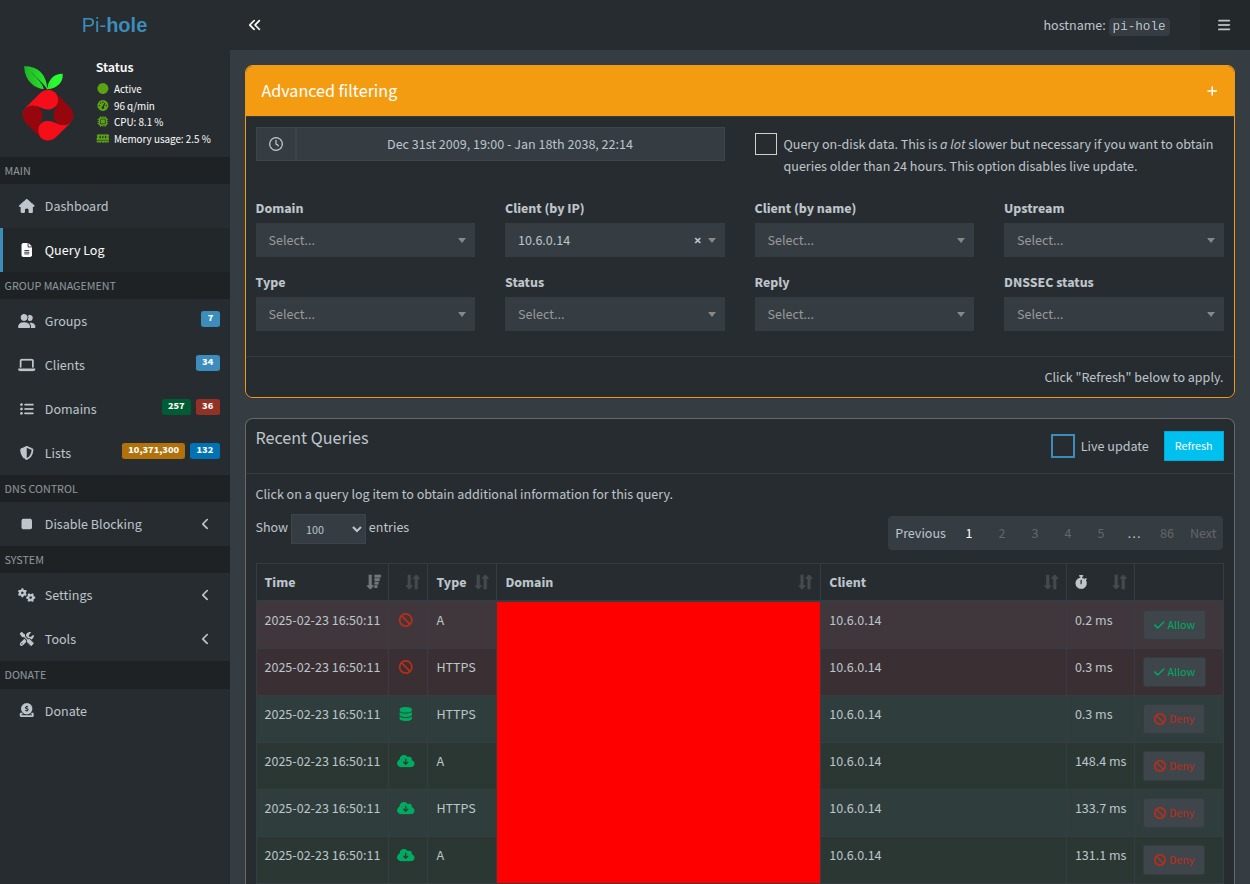
These results show conclusive evidence that the phone is WireGuard tunneled into the LAN, even when - and this is funny - it is already on the LAN. In the WireGuard mobile app (at least on iOS), it is possible to have the tunnel activate only on-demand (e.g. when leaving Wi-Fi). I set mine to activate when joining both cellular and Wi-Fi with an option to exclude my home network SSIDs (BSSIDs would be preferred, but it is what it is). While there is no issue being on the VPN while at home, it is not necessary.
Because remote access has been established over the VPN tunnel, local resources can now also be accessed remotely. While the tunnel is active, for example, both the Asuswrt-Merlin and Pi-hole administrative UIs are reachable. To me, this is an added bonus aside from remotely sinkholing ads and trackers and securing DNS.
While tunneled into the LAN, if it was not already obvious, the public IP of the WireGuard client (in this case, my phone) will appear to be the WAN IP assigned from the ISP. At first, this may seem like a drawback for those of us that normally use VPN apps on our mobile devices (e.g. Proton VPN) - myself included. Thankfully, however, this can be remedied with VPN Director the same exact way I have outlined several times between this and my previous guide.

Voilà! With a simple rule added to VPN Director, clients in 10.6.0.0/24 are directed out through a particular interface (in this case, OVPN3, configured as a Proton VPN OpenVPN client). This means that client traffic connecting to the LAN over the WireGuard VPN will now use Pi-hole for DNS resolution - which is itself being routed out through Proton VPN - and leave the LAN over a second OpenVPN tunnel to a Proton VPN server. Thus, the transit through the LAN can be considered a sort of network “pit stop” with the following key advantages:
- Maintain normal VPN connection to VPN provider
- Fewer utilized active tunnel count if provider sets a limit
- Remote access to Pi-hole’s DNS sinkholing and encryption
- Remote access to any other local resources
- Tunnel connection can simply remain active 24/7 even while at home
As a final point, I highly recommend setting all OpenVPN Client configs in Asuswrt-Merlin to Accept DNS Configuration: Disabled in order to prevent the VPN provider from pushing its DNS servers down to connecting clients (we only want to use Pi-hole for DNS). According to Asuswrt-Merlin, the following options are available (“how should your router handle DNS servers pushed by the remote VPN server?):
Disabled: ignore themRelaxed: just add to list of known DNSStrict: add to list, but use all servers in order specifiedExclusive: use only these servers for all queries (use this if no Pi-hole!)
Similarly, for all WireGuard Client confgs, set DNS Server (Optional) to a blank entry (do NOT set this to the local IP address assigned to Pi-hole as this causes unanticipated issues).
The only other point potentially worth mentioning here would be setting up a firewall rule in the router (or wherever else) to drop any outbound DNS traffic from LAN devices in the event that any of them bypass the Pi-hole for DNS. That, or a NAT policy to redirect any outbound DNS traffic to Pi-hole. I have to suspect that certain platforms and embedded systems maintain hardcoded DNS settings (who knows what else?) to function properly.
This will probably be the longest Changelog post I will ever author on this site, but it was - in my mind anyways - too significant and relevant to the original post to not update it. If I get around to it, I will add a final graphic showing the network flow of all the combined parts (most notably, inbound VPN clients).
Update: Feb 28, 2025 (Remote Access #2: OpenVPN)
While the WireGuard configuration and connections do work well and are more battery efficient due to the primitives WireGuard uses vs. OpenVPN, similar to my complaint from my previous blog post … WireGuard maintains no truly functional kill switch. I also found it to seemingly randomly disconnect with no reconnect attempt made, and it did not notify me that it did this. For this reason, I set up an OpenVPN server on my router to do the same thing mentioned above for remote access and sinkholing. The WireGuard connections will be a backup method if for whatever reason the OpenVPN tunnels stop working while away from home.
In Asuswrt-Merlin, the OpenVPN server utilizes 10.8.0.0/24, so I had to allow this in my Pi-hole’s firewall and add the subnet to VPN Director rules. It turns out to be a little more annoying to assign static IPs to clients in the OpenVPN server setting vs. that of WireGuard, but it can be done. Server config files are written to /tmp/etc/openvpn/server1 at startup (custom client settings can be set in /tmp/etc/openvpn/server1/ccd).
To get this working, I had to implement username/password authentication to identify specific clients and use username-as-common-name to add additional custom settings to client configs. I could not find a way in the web UI to maintain IP reservations for clients, but I did find a way using a Bash startup script.
The following script is called from services-start and waits for the client config file to exist before appending the ifconfig-push line to it. The hope is that this will always be executed before the client can connect. This is really only important for identifying devices in Pi-hole and assigning the proper groups to them.
client="/tmp/etc/openvpn/server1/ccd/iphone"
until [[ -e "$client" ]]; do :; done
echo "ifconfig-push 10.8.0.14 255.255.255.255" >> "$client"
In the OpenVPN mobile app settings, unlike in the WireGuard app, there is a Seamless Tunnel option to enable a kill switch (block Internet while VPN is paused or reconnecting). It also has its own battery saving “solution” called Battery Saver (do not reconnect when the device is locked and the screen is not active). The Connection Timeout setting can also be set to CONTINUOUSLY RETRY to have it never give up. Combine these three settings together and the advantages, to me, outweigh WireGuard.
Update: Sep 5, 2025 (IP Address Encryption)
In dnscrypt-proxy version 2.1.14, the open specification for IPCrypt was implemented to optionally encrypt and obfuscate IP addresses. Although this post details and recommends anonymization - thus rendering logs and correlation efforts fruitless - it certainly cannot hurt to encrypt data written to logs (again, we always assume logs are kept).
Three algorithms are supported in dnscrypt-proxy and compared in the IPCrypt specification. I personally prefer the 16-byte tweak non-deterministic ipcrypt-ndx (AES-XTS) algorithm due to its improvement over the deterministic option in defeating correlation attacks. The 8-byte tweak ipcrypt-nd is also acceptable, but produces collisions after 264/2 = 232 (approximately 4 billion) operations whereas the 16-byte tweak produces collisions after 2128/2 = 264 (approximately 18 quintillion) operations.
In short, I recommend adding the following configuration items to the [ip_encryption] section in dnscrypt-proxy.toml when updating to dnscrypt-proxy version 2.1.14 and higher, after generating a random 32-byte key (this should be rotated for maximum security):
┌▪ (drew@pc)-[~]
└▪ openssl rand -hex 32
a951e269ea5afd2b6c5d7d3147b48a4bd1bdda6448f350f8560d55a392ee811e
algorithm = "ipcrypt-ndx"
key="a951e269ea5afd2b6c5d7d3147b48a4bd1bdda6448f350f8560d55a392ee811e"